Views: 62 Author: Monica Publish Time: 2026-02-02 Origin: Site


ASME B16.5 is limited to pipe flanges and flanged fittings, blind flanges, reducing flanges, and related flange bolts, flange gaskets, and flange joints. It covers flanges of pressure classes 150, 300, 400, 600, 900, 1500, and 2500. Sizes are given in metric and U.S. customary units from NPS 1⁄2 to NPS 24.

ASME/ANSI B16.5 provides:
Weld neck flange
Slip-on flange
Socket weld flange
Blind flange
Threaded flange
Lap joint flange
Size
In NPS, is designation for nominal flange or flange fittings size. NPS related to nominal diameter, DN in international standards, relations as below:
NPS | DN |
1⁄2 | 15 |
3⁄4 | 20 |
1 | 25 |
11⁄4 | 32 |
11⁄2 | 40 |
2 | 50 |
21⁄2 | 65 |
3 | 80 |
4 | 100 |
NOTE: For NPS ≥ 4, the related DN is DN = 25 (NPS).
Markings
Name: Manufacturer's name or trademark
Material: Cast or Forged, material standard ASTM xxx.
Pressure Ratings: (i.e., Class 150, 300, 400, 600, 900, 1500, or 2500)
Conformance: ASME B16.5 or other B16 standard.
Temperature: If a temperature is noted, indicate the corresponding pressure rating.
Size: NPS
Ring Joint Flanges: Shall be marked with letter R and ring groove number.
Multiple Material Marking: In case multiple material used.
Materials
ASTM A105 for forged carbon steel flange
ASTM A350 for forged carbon steel, low alloy steel flange
ASTM A182 for alloy steel flange and stainless steel flange
ASTM A216 for casting carbon steel flanges
ASTM A352, ASTM A217
ASTM A515 Gr 70, 65 for plates flange
ASTM A516 Gr 70, 65 for carbon and low alloy steel plates flange
ASTM A203, A204
ASTM A387 Gr 11, 22, 91 CL 2 for alloy steel plates flange
ASTM A240 Grade 304/L, 316/L for stainless steel plate flange
CLASS 150 PIPE FLANGES AND FLANGED FITTINGS
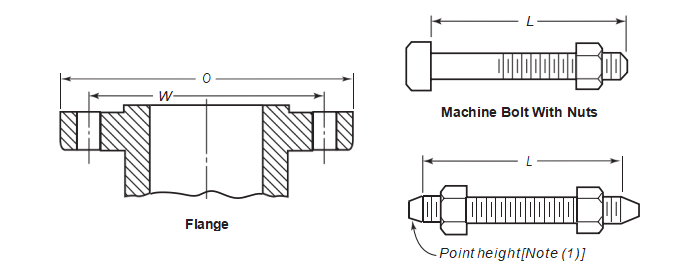
Table 1 Templates for Drilling Class 150 Flanges
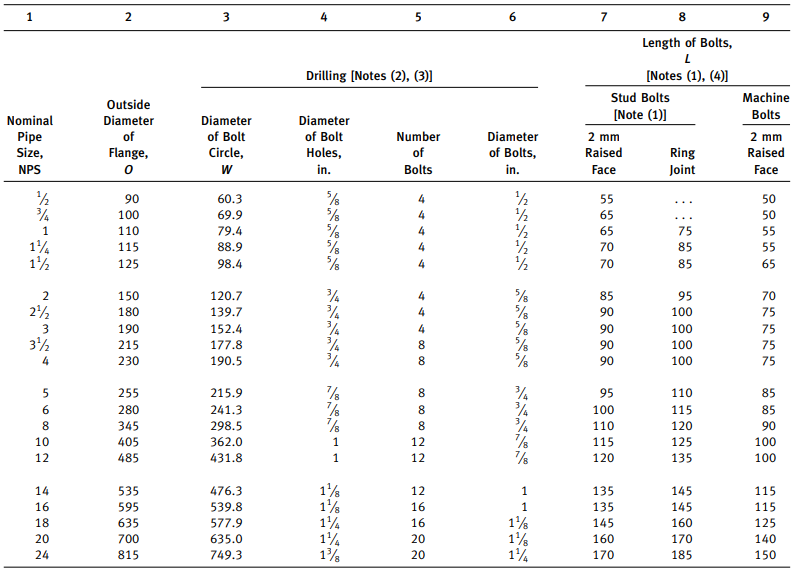
NOTES:
(1) Length of stud bolt does not include the height of the points.
(2) For flange bolt holes.
(3) For spot facing.
(4) Bolt lengths not shown in table may be determined in accordance with Annex D.

Table2 Dimensions of Class 150 Flanges

NOTES:
(1) This dimension is for large end of hub, which may be straight or tapered.
(2) The minimum thickness of these loose flanges, in sizes NPS 3 1⁄2 and smaller, is slightly greater than the thickness of flanges on fittings, Table 9, which are reinforced by being cast integral with the body of the fitting.
(3) These flanges may be supplied with a flat face. The flat face may be either the full tf dimension of thickness plus 2 mm, or the tf dimension thickness without the raised face height.
(4) The flange dimensions illustrated are for regularly furnished 2 mm raised face (except lapped); for requirements of other facings, see Fig. 7.
(5) For welding end bevel
(6) For thread of threaded flanges
(7) Dimensions in Column 13 correspond to the inside diameters of pipe as given in ASME B36.10M for Standard Wall pipe. Thickness of Standard Wall is the same as Schedule 40 in sizes NPS 10 and smaller.
These bore sizes are furnished unless otherwise specified by the purchaser.
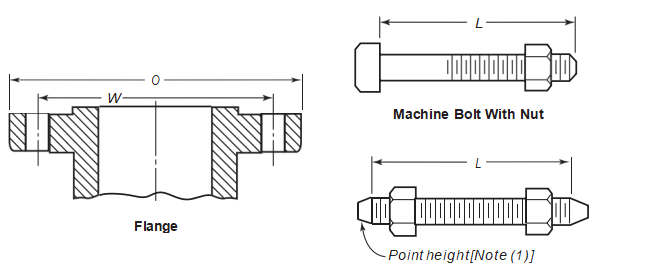
Table 3 Templates for Drilling Class 300 Flanges
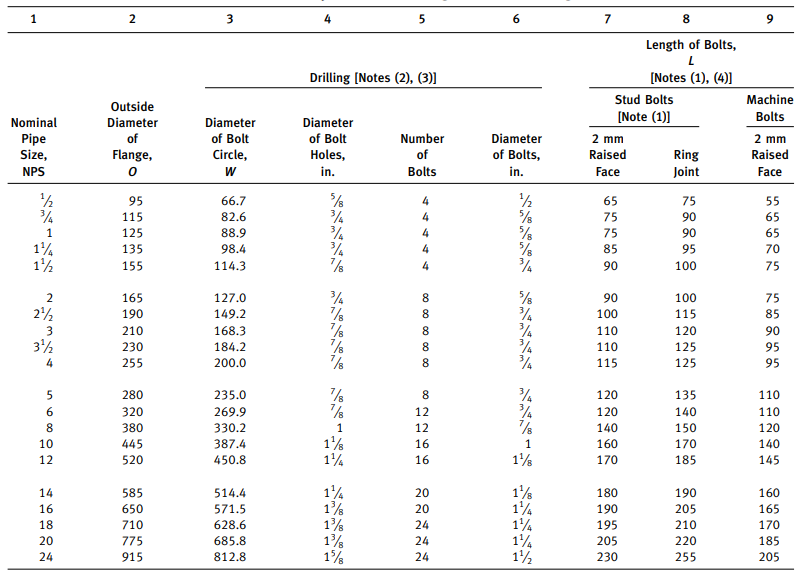
NOTES:
(1) Length of stud bolt does not include the height of the points.
(2) For flange bolt holes.
(3) For spot facing.
(4) Bolt lengths not shown in table may be determined in accordance with Annex D.
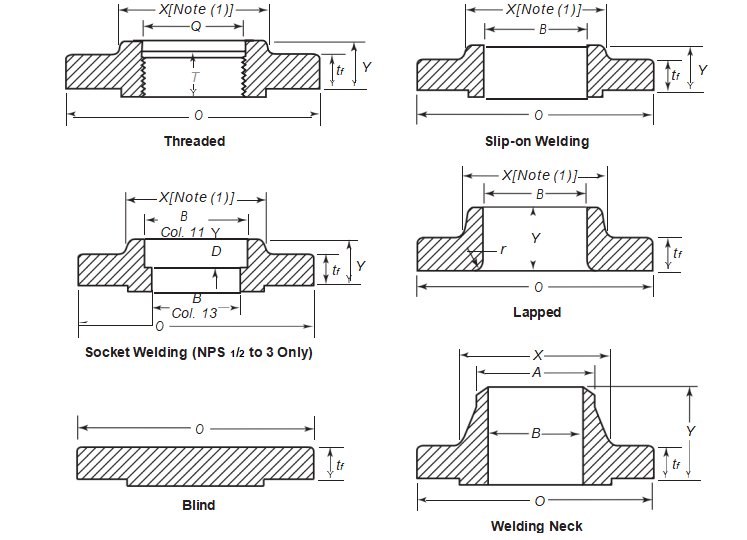
Table 4 Dimensions of Class 300 Flanges
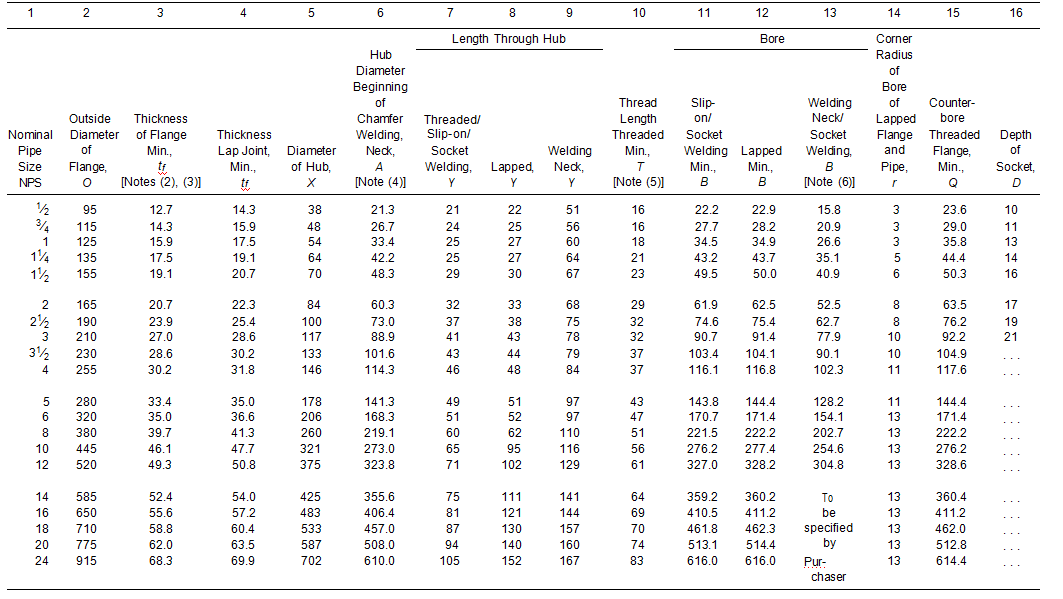
NOTES:
(1) This dimension is for large end of hub, which may be straight or tapered.
(2) These flanges may be supplied with a flat face. The flat face may be either the full tf dimension thickness plus 2 mm or the tf dimension thickness without the raised face height.
(3) The flange dimensions illustrated are for regularly furnished 2 mm raised face (except lapped); for requirements of other facings, see Fig. 7.
(4) For welding end bevel.
(5) For thread of threaded flanges.
(6) Dimensions in Column 12 correspond to the inside diameters of pipe as given in ASME B36.10M for Standard Wall pipe. Standard Wall dimensions are the same as Schedule 40 in sizes NPS 10 and smaller. These bore sizes are furnished unless otherwise specified by the purchaser.

Table 5 Templates for Drilling Class 400 Flanges
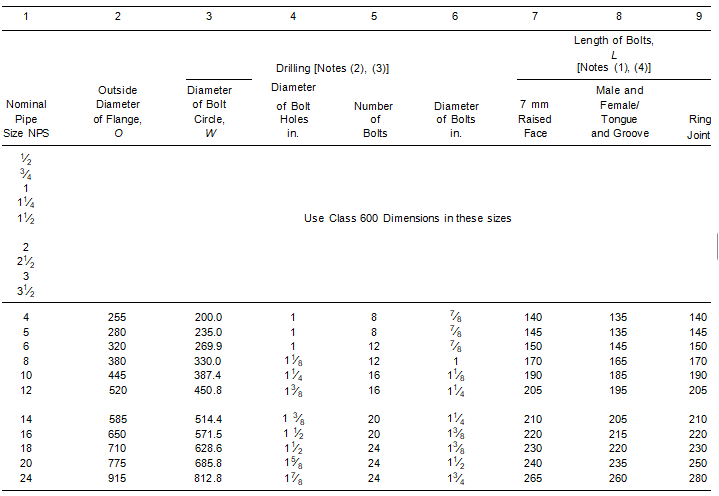
NOTES:
(1) Length of stud bolt does not include the height of the points.
(2) For flange bolt holes.
(3) For spot facing.
(4) Bolt lengths not shown in table may be determined in accordance with Annex D.
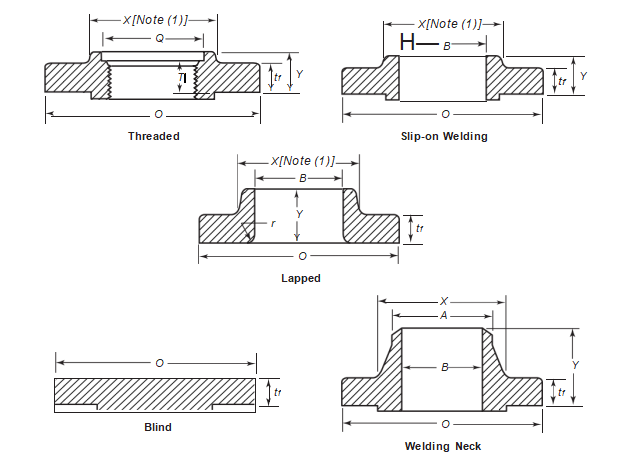
Table 6 Dimensions of Class 400 Flanges
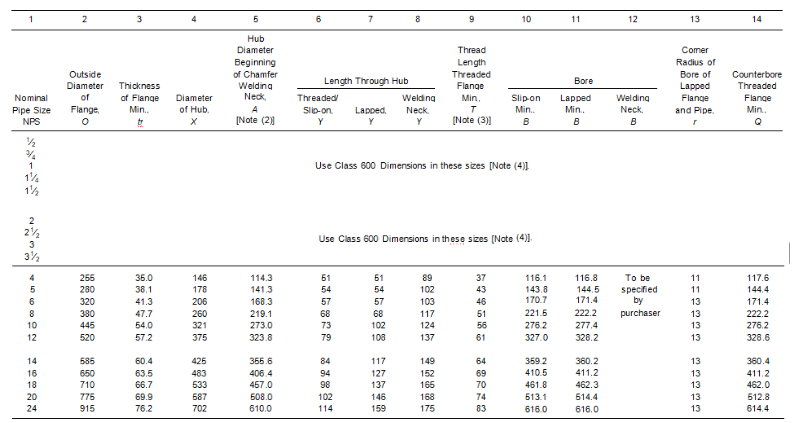
NOTES:
(1) This dimension is for large end of hub, which may be straight or tapered. Taper shall not exceed 7 deg on threaded, slip-on, socket-welding, and lapped flanges. This dimension is defined as the diameter at the intersection between the hub taper and the back face of the flange.
(2) For welding end bevel.
(3) For thread of threaded flanges.
(4) Socket welding flanges may be provided in NPS 1⁄2 through NPS 21⁄2, using Class 600 dimensions.

Table 7 Templates for Drilling Class 600 Flanges
1 | 2 | 3 | 4 | 5 | 6 | 7 | 8 | 9 |
Length of Bolts, | ||||||||
L | ||||||||
Drilling [Notes(2), (3)] | [Notes (1), (4)] | |||||||
Outside | Diameter | Diameter | Male and | |||||
Nominal | Diameter | of Bolt | of Bolt | Number | Diameter | 7 mm | Female/ | |
Pipe Size | of Flange, | Circle, | Holes | of | of Bolts | Raised | Tongue | Ring |
NPS | O | W | in. | Bolts | in. | Face | and Groove | Joint |
1⁄2 | 95 | 66.7 | 5⁄8 | 4 | 1⁄2 | 75 | 70 | 75 |
3⁄4 | 115 | 82.6 | 3⁄4 | 4 | 5⁄8 | 90 | 85 | 90 |
1 | 125 | 88.9 | 3⁄4 | 4 | 5⁄8 | 90 | 85 | 90 |
11⁄4 | 135 | 98.4 | 3⁄4 | 4 | 5⁄8 | 95 | 90 | 95 |
11⁄2 | 155 | 114.3 | 7⁄8 | 4 | 3⁄4 | 110 | 100 | 110 |
2 | 165 | 127.0 | 3⁄4 | 8 | 5⁄8 | 110 | 100 | 110 |
21⁄2 | 190 | 149.2 | 7⁄8 | 8 | 3⁄4 | 120 | 115 | 120 |
3 | 210 | 168.3 | 7⁄8 | 8 | 3⁄4 | 125 | 120 | 125 |
31⁄2 | 230 | 184.2 | 1 | 8 | 7⁄8 | 140 | 135 | 140 |
4 | 275 | 215.9 | 1 | 8 | 7⁄8 | 145 | 140 | 145 |
5 | 330 | 266.7 | 11⁄8 | 8 | 1 | 165 | 160 | 165 |
6 | 355 | 292.1 | 11⁄8 | 12 | 1 | 170 | 165 | 170 |
8 | 420 | 349.2 | 11⁄4 | 12 | 11⁄8 | 190 | 185 | 195 |
10 | 510 | 431.8 | 13⁄8 | 16 | 11⁄4 | 215 | 210 | 215 |
12 | 560 | 489.0 | 13⁄8 | 20 | 11⁄4 | 220 | 215 | 220 |
14 | 605 | 527.0 | 11⁄2 | 20 | 13⁄8 | 235 | 230 | 235 |
16 | 685 | 603.2 | 15⁄8 | 20 | 11⁄2 | 255 | 250 | 255 |
18 | 745 | 654.0 | 13⁄4 | 20 | 15⁄8 | 275 | 265 | 275 |
20 | 815 | 723.9 | 13⁄4 | 24 | 15⁄8 | 285 | 280 | 290 |
24 | 940 | 838.2 | 2 | 24 | 17⁄8 | 330 | 325 | 335 |
NOTES:
(1) Length of stud bolt does not include the height of the points.
(2) For flange bolt holes.
(3) For spot facing.
(4) Bolt lengths not shown in table may be in accordance with Annex D.
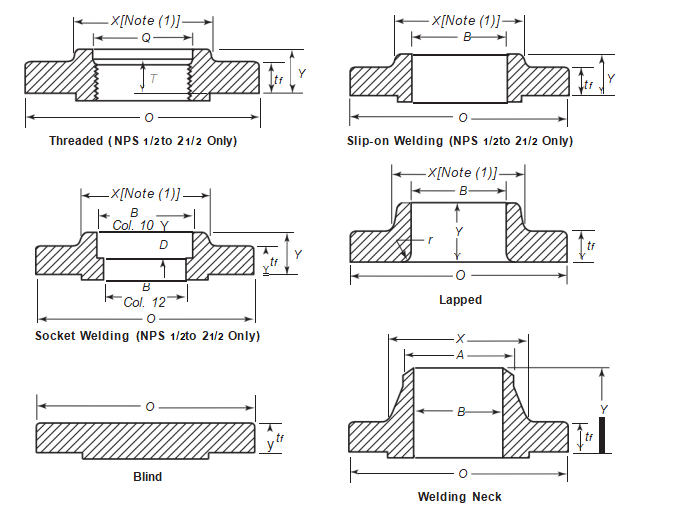
Table 8 Dimensions of Class 600 Flanges
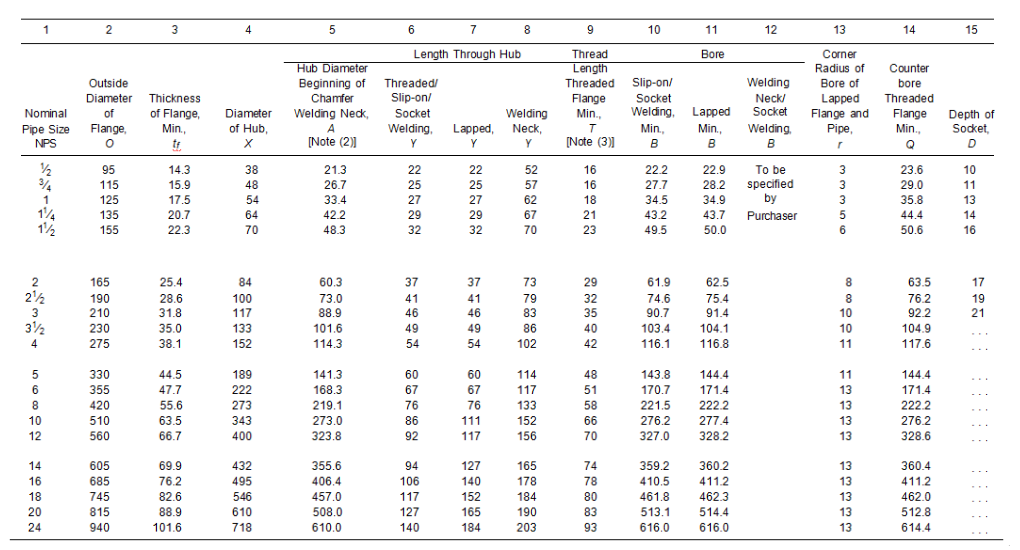
NOTES:
(1) This dimension is for large end of hub, which may be straight or tapered. Taper shall not exceed 7 deg on threaded, slip-on, socket-welding, and lapped flanges. This dimension is defined as the diameter at the intersection between the hub taper and the back face of the flange.
(2) For welding end bevel.
(3) For thread of threaded flanges.

Table 9 Templates for Drilling Class 900 Flanges
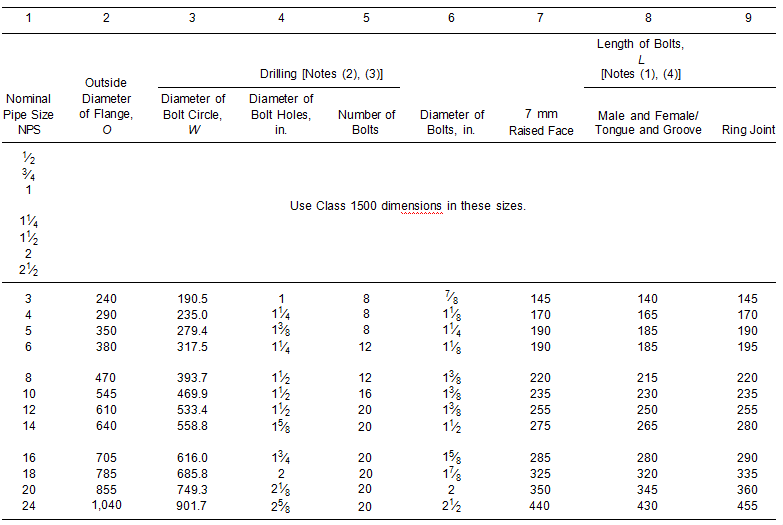
NOTES:
(1) Length of stud bolt does not include the height of the points.
(2) For flange bolt holes.
(3) For spot facing.
(4) Bolt lengths not shown in Table may be determined in accordance with Annex D.
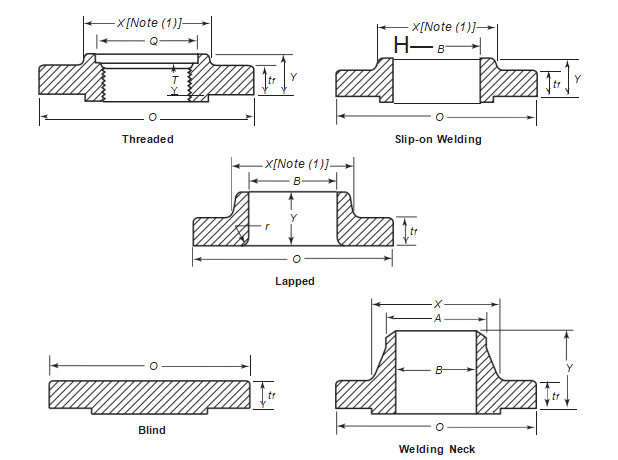
Table 10 Dimensions of Class 900 Flanges
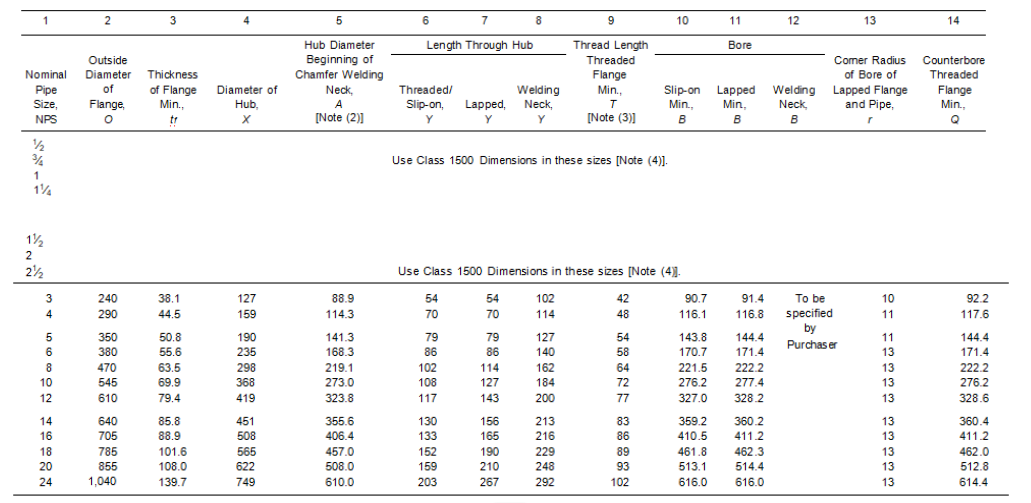
NOTES:
(1) This dimension is for large end of hub, which may be straight or tapered. Taper shall not exceed 7 deg on threaded, slip-on, socket-welding, and lapped flanges. This dimension is defined as the diameter at the intersection between the hub taper and the back face of the flange.
(2) For welding end bevel.
(3) For thread of threaded flanges.
(4) Socket welding flanges may be provided in NPS 1⁄2 through NPS 21⁄2, using Class 1500 dimensions.

Table 11 Templates for Drilling Class 1500 Flanges
1 | 2 | 3 | 4 5 | 6 | 7 | 8 | 9 | |
Nominal Pipe Size, NPS | Outside Diameter of Flange, O | Drilling [Notes (2), (3)] | Length of Bolts, L [Notes (1), (4)] | |||||
Diameter of Bolt Circle, W | Diameter of Bolt Holes, in. | Number of Bolts | Diameter of Bolts, in. | 7 mm Raised Face | Male and Female/ Tongue and Groove | Ring Joint | ||
1⁄2 | 120 | 82.6 | 7⁄8 | 4 | 3⁄4 | 110 | 100 | 110 |
3⁄4 | 130 | 88.9 | 7⁄8 | 4 | 3⁄4 | 115 | 110 | 115 |
1 | 150 | 101.6 | 1 | 4 | 7⁄8 | 125 | 120 | 125 |
11⁄4 | 160 | 111.1 | 1 | 4 | 7⁄8 | 125 | 120 | 125 |
11⁄2 | 180 | 123.8 | 11⁄8 | 4 | 1 | 140 | 135 | 140 |
2 | 215 | 165.1 | 1 | 8 | 7⁄8 | 145 | 140 | 145 |
21⁄2 | 245 | 190.5 | 11⁄8 | 8 | 1 | 160 | 150 | 160 |
3 | 265 | 203.2 | 11⁄4 | 8 | 11⁄8 | 180 | 170 | 180 |
4 | 310 | 241.3 | 13⁄8 | 8 | 11⁄4 | 195 | 190 | 195 |
5 | 375 | 292.1 | 15⁄8 | 8 | 11⁄2 | 250 | 240 | 250 |
6 | 395 | 317.5 | 11⁄2 | 12 | 13⁄8 | 260 | 255 | 265 |
8 | 485 | 393.7 | 13⁄4 | 12 | 15⁄8 | 290 | 285 | 325 |
10 | 585 | 482.6 | 2 | 12 | 17⁄8 | 335 | 330 | 345 |
12 | 675 | 571.5 | 21⁄8 | 16 | 2 | 375 | 370 | 385 |
14 | 750 | 635.0 | 23⁄8 | 16 | 21⁄4 | 405 | 400 | 425 |
16 | 825 | 704.8 | 25⁄8 | 16 | 21⁄2 | 445 | 440 | 470 |
18 | 915 | 774.7 | 27⁄8 | 16 | 23⁄4 | 495 | 490 | 525 |
20 | 985 | 831.8 | 31⁄8 | 16 | 3 | 540 | 535 | 565 |
24 | 1 170 | 990.6 | 35⁄8 | 16 | 31⁄2 | 615 | 610 | 650 |
NOTES:
(1) Length of stud bolt does not include the height of the points.
(2) For flange bolt holes
(3) For spot facing

 (4) Bolt lengths not shown in table may be determined in accordance with Annex D.
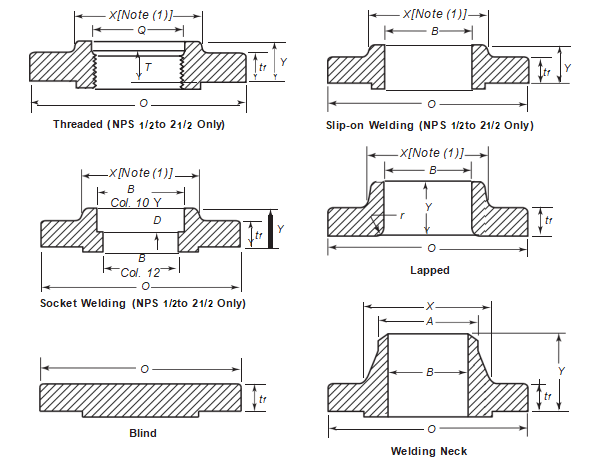
Table 12 Dimensions of Class 1500 Flanges
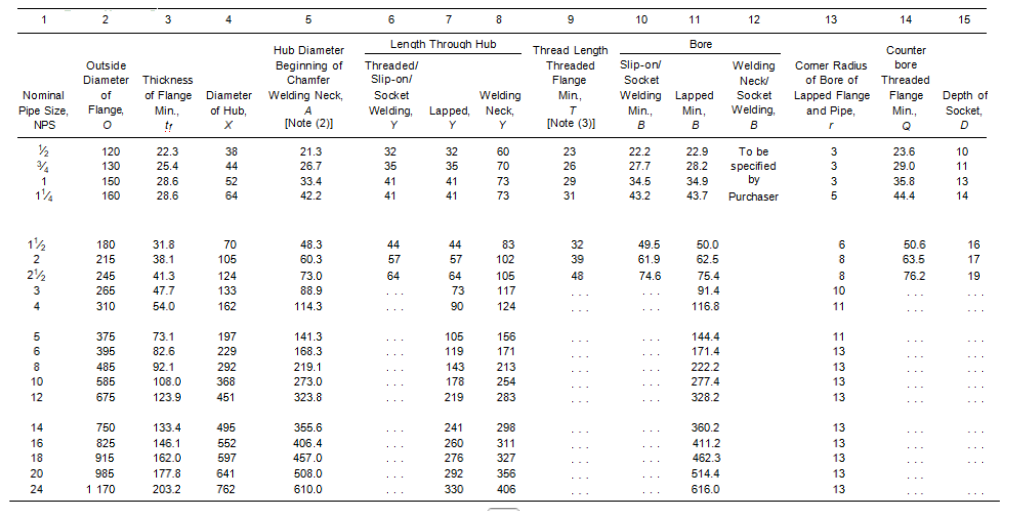
NOTES:
(1) This dimension is for large end of hub, which may be straight or tapered. Taper shall not exceed 7 deg on threaded, slip-on, socket-welding, and lapped flanges. This dimension is defined as the diameter at the intersection between the hub taper and the back face of the flange.
(2) For welding end bevel.
(3) For thread of threaded flanges.

Table 13 Templates for Drilling Class 2500 Flanges
1 | 2 | 3 | 4 5 | 6 | 7 | 8 | 9 | |
Nominal Pipe Size, NPS | Outside Diameter of Flange, O | Drilling [Notes (2), (3)] | Diameter of Bolts, in. | Length of Bolts, L [Notes (1), (4)] | ||||
Diameter of Bolt Circle, W | Diameter of Bolt Holes, in. | Number of Bolts | 7 mm Raised Face | Male and Female/ Tongue and Groove | Ring Joint | |||
1⁄2 | 135 | 88.9 | 7⁄8 | 4 | 3⁄4 | 120 | 115 | 120 |
3⁄4 | 140 | 95.2 | 7⁄8 | 4 | 3⁄4 | 125 | 120 | 125 |
1 | 160 | 108.0 | 1 | 4 | 7⁄8 | 140 | 135 | 140 |
11⁄4 | 185 | 130.2 | 11⁄8 | 4 | 1 | 150 | 145 | 150 |
11⁄2 | 205 | 146.0 | 11⁄4 | 4 | 11⁄8 | 170 | 165 | 170 |
2 | 235 | 171.4 | 11⁄8 | 8 | 1 | 180 | 170 | 180 |
21⁄2 | 265 | 196.8 | 11⁄4 | 8 | 11⁄8 | 195 | 190 | 205 |
3 | 305 | 228.6 | 13⁄8 | 8 | 11⁄4 | 220 | 215 | 230 |
4 | 355 | 273.0 | 15⁄8 | 8 | 11⁄2 | 255 | 250 | 260 |
5 | 420 | 323.8 | 17⁄8 | 8 | 13⁄4 | 300 | 290 | 310 |
6 | 485 | 368.3 | 21⁄8 | 8 | 2 | 345 | 335 | 355 |
8 | 550 | 438.2 | 21⁄8 | 12 | 2 | 380 | 375 | 395 |
10 | 675 | 539.8 | 25⁄8 | 12 | 21⁄2 | 490 | 485 | 510 |
12 | 760 | 619.1 | 27⁄8 | 12 | 23⁄4 | 540 | 535 | 560 |
NOTES:
(1) Length of stud bolt does not include the height of the points.
(2) For flange bolt holes.
(3) For spot facing.
 (4) Bolt lengths not shown in table may be determined with Annex.
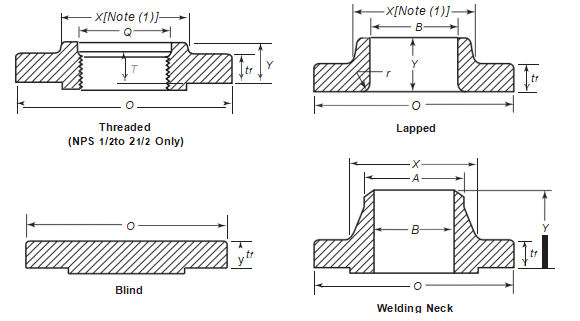
Table 14 Dimensions of Class 2500 Flanges
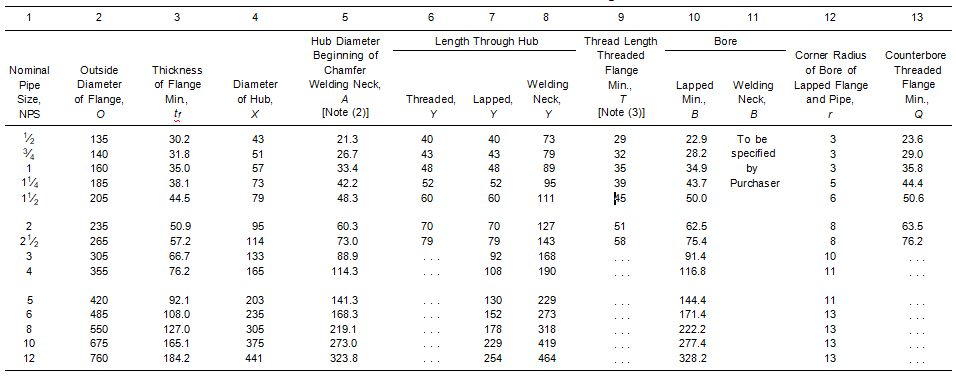
NOTES:
(1) This dimension is for large end of hub, which may be straight or tapered. Taper shall not exceed 7 deg on threaded, slip-on, socket-welding, and lapped flanges. This dimension is defined as the diameter at the intersection between the hub taper and the back face of the flange.
(2) For welding end bevel.
(3) For thread of threaded flanges.
Center-to-Contact Surfaces and Center-to-End Tolerances
(a) Center-to-Contact Surfaces Other Than Ring Joint:
NPS ≤ 10 ±1.0 mm (±0.03 in.)
NPS ≥ 12 ±1.5 mm (±0.06 in.)
(b) Center-to-End (Ring Joint):
NPS ≤ 10 ±1.0 mm (±0.03 in.)
NPS ≥ 12 ±1.5 mm (±0.06 in.)
(c) Contact Surface-to-Contact Surface Other Than Ring Joint:
NPS ≤ 10 ±2.0 mm (±0.06 in.)
NPS ≥ 12 ±3.0 mm (±0.12 in.)
(d) End-to-End (Ring Joint):
NPS ≤ 10 ±2.0 mm (±0.06 in.)
NPS ≥ 12 ±3.0 mm (±0.12 in.)
Flanges are not required to be pressure tested
Flanged Fitting Test
Shell Pressure Test: The shell pressure test pressure for flanged fittings shall be no less than 1.5 times the pressure rating at 38°C (100°F), rounded up to the next higher 1 bar (25 psi) increment.
Test Fluid:
Water (with the addition of corrosion inhibitors) or kerosene shall be used as the test fluid. The test fluid temperature shall not exceed 50°C (125°F).
Test Duration:
Flanged Fittings Size | Duration, Sec |
NPS ≤ 2 | 60 |
2 1/2 ≤ NPS ≤ 8 | 120 |
NPS ≥ 10 | 180 |